FAQ
How do I make sure the WAHTS is charging?
Make sure that the shipping switch on the WAHTS is in the On position while charging, by sliding the switch in the red ear cup to the right.

At this time, there is no light or LED to indicate the WAHTS is charging or to indicate when charging is complete. The amount of time required to charge depends on the current battery level, but charging for two to three hours should be plenty to fully charge the WAHTS. Once charged, battery levels can be checked by connecting to CHAMI or TabSINT.
How do I reboot the WAHTS?
The WAHTS can be rebooted by cycling the power using the shipping switch in the right ear cup.
The connection is dropping between the WAHTS and TabSINT. What should I do?
- Make sure the headset is fully charged. You can check battery levels by connecting the WAHTS to TabSINT. Make sure the headset is not plugged into a wall outlet for an accurate review of the headsets battery levels.
- Reboot the WAHTS by cycling power.
I keep seeing the word "CHA", what is that?
In documentation and in TabSINT you may come across the word CHA. CHA is the nomenclature for the internal electronics inside the WAHTS and inside some other Creare hearing assessment devices. For the sake of ease, consider the two terms interchangeable.
How do I retrieve tablet logs?
- Go to the Application Log section in the Admin View
- Select
Export - The logs are saved to the tablet at
My files/Device Storage/Documents/tabsint-logs - Connect your tablet to your computer via USB to copy the files from the tablet

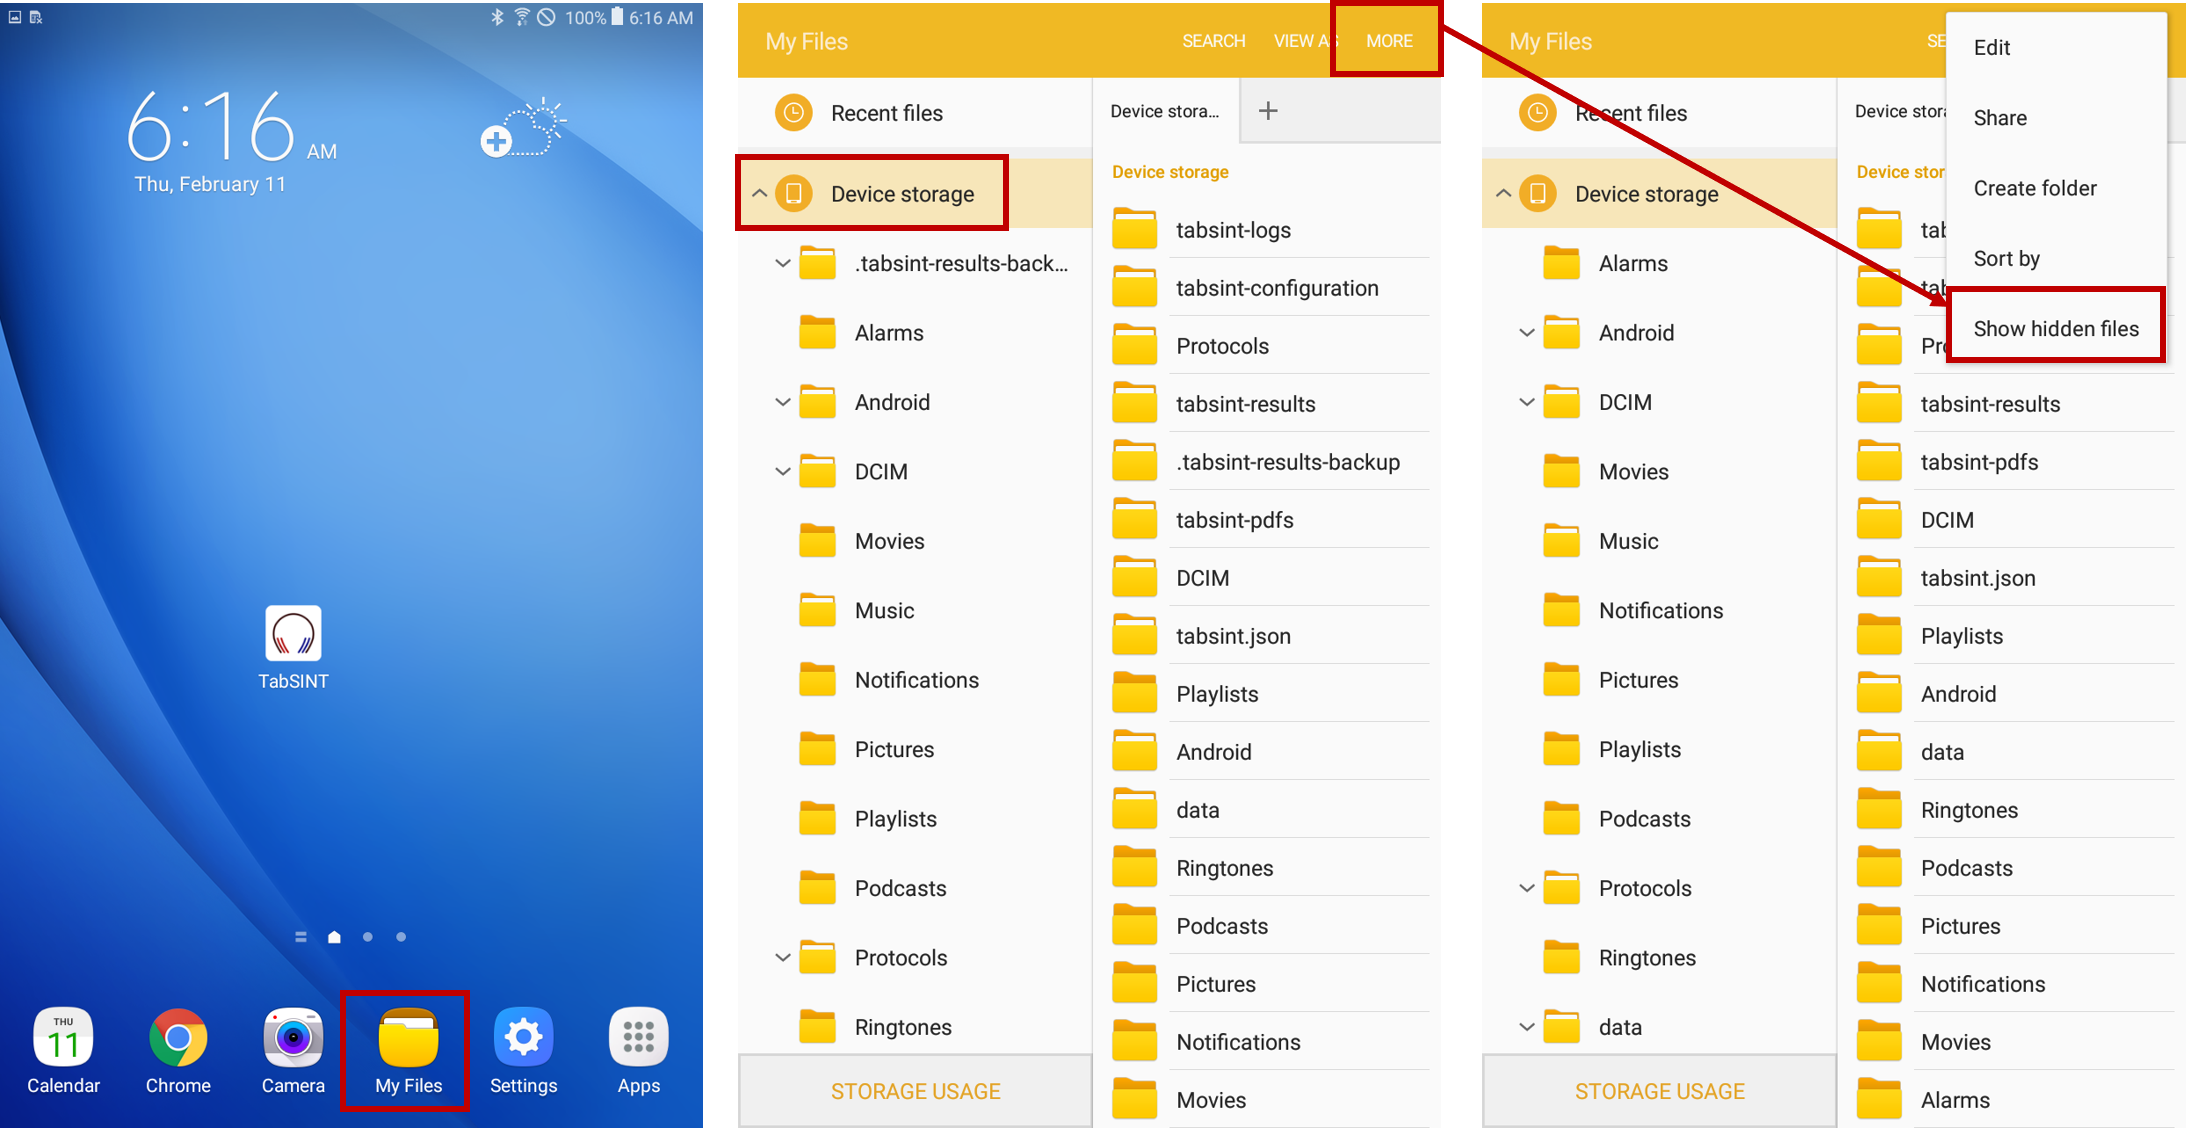
If .tabsint-logs is not visible in
Device Storage, selectMoreat the upper right corner, then selectShow hidden files
How do I find my tablet or device UUID?
In TabSINT you can view the Device UUID and TabSINT UUID.
The device UUID can be seen in two places:
- The last 5 digits of the UUID are displayed on the bottom of the launch screen
- The full UUID is available in the Software and Hardware section of the Setup Tab
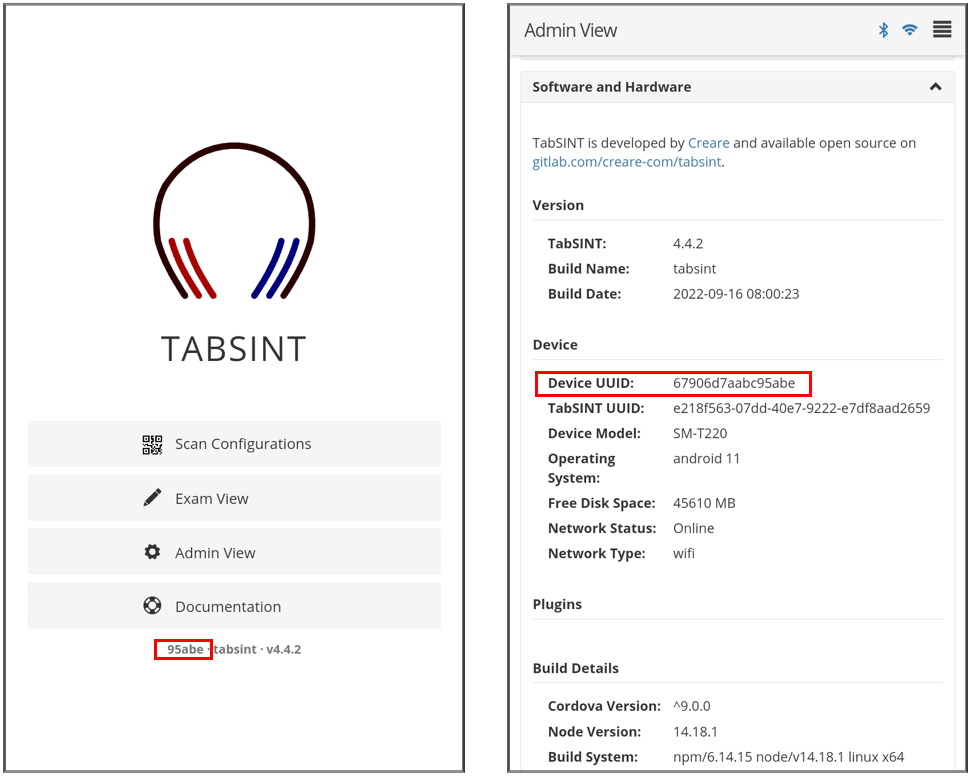
Upon install of TabSINT you will be prompted to provide permission to the devices shared storage. It is important to navigate to and select the documents folder for this task. The TabSINT UUID is specific to TabSINT and is created when TabSINT is first installed. The TabSINT UUID will be the same even if their are mulptiple instances of TabSINT on the same tablet as long as the documents folder is selected when prompted.
The TabSINT UUID can be seen in two places:
- The full UUID is available in the Software and Hardware section of the Setup Tab
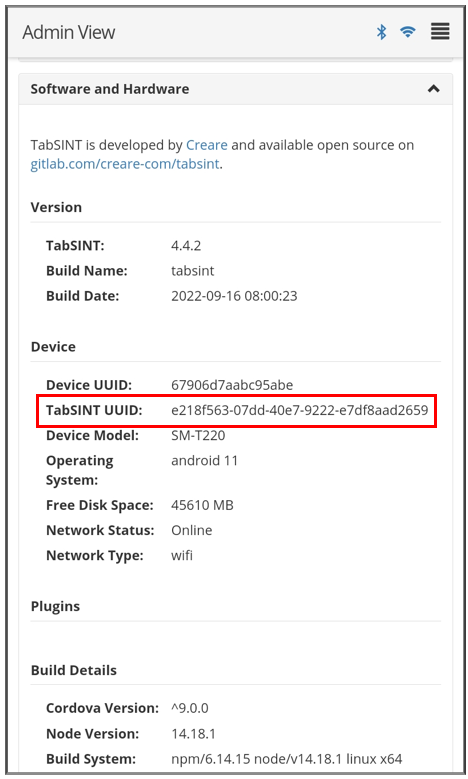
- The full UUID is also viewed in the Documents folder as a .uuid.txt file. This file can be viewed by selecting the file and then selecting HTML Viewer.
*If the file does not appear in the documents folder it may be hidden. Select the menu option in the documents folder (the three dots in the corner) and select "Show Hidden Files."
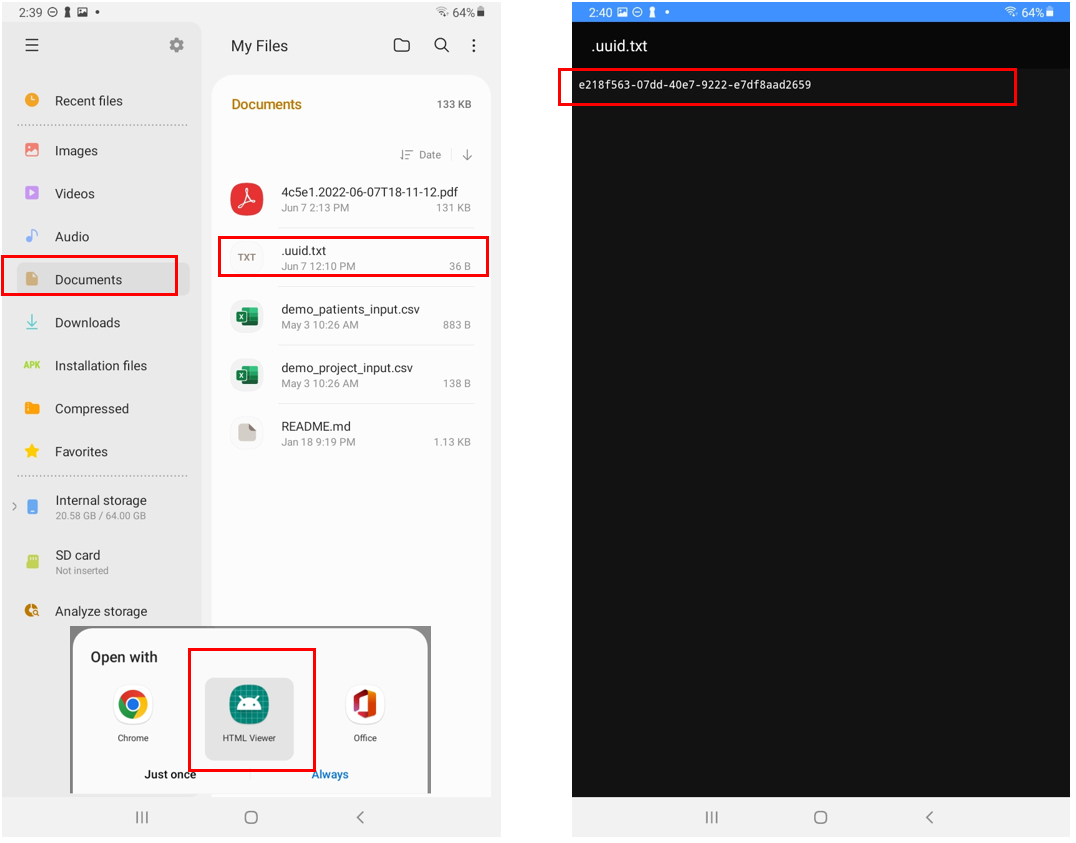
- The Device UUID will change for each new TabSINT install. The TabSINT UUID will stay the same once the uuid.txt file is created in the documents folder.
Why are some results uploaded to Gitlab multiple times?
Results can sometimes be duplicated on the backend (TabSINT server or Gitlab). This happens when the tablet has a poor network connection and the results get uploaded to the server but the upload process is interrupted for some reason before the result is removed from the tablet. TabSINT is conservative in result handling and will err on the side of uploading duplicate results instead of inadvertently removing result files.
How do I end an exam early?
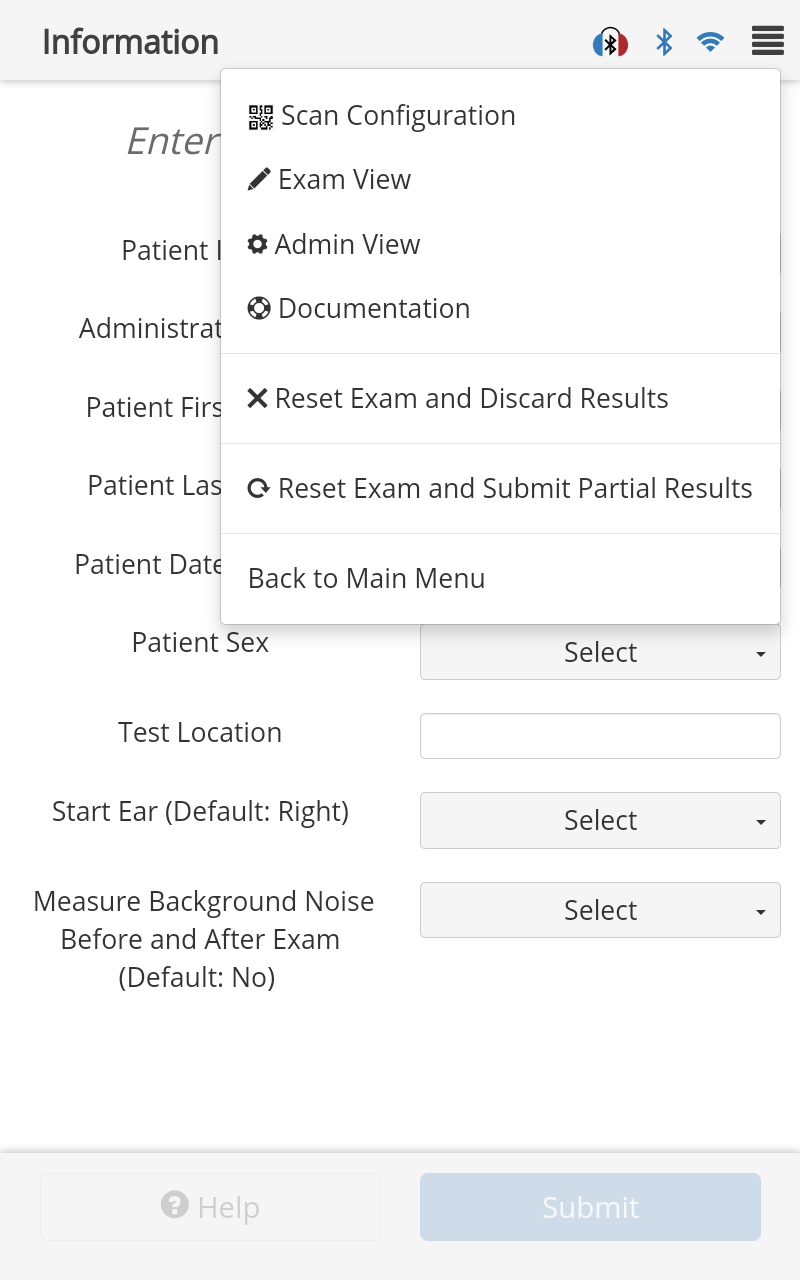
To end a TabSINT exam early, open the navigation menu in the upper right corner. For there, you can choose to:
Reset Exam and Discard Results- end the exam and discard the data collected so far for this subject sessionReset Exam and Submit Partial Results- end the exam and save the data collected so far for this subject session
When you select either of these options, TabSINT will prompt for the Admin pin to be entered in order to keep subjects from inadvertently navigating away from the exam (unless Admin Mode is checked in the TabSINT configuration, as this parameter turns off the prompts for the Admin pin).
How do I know the WAHTS is connected to TabSINT?
There are three primary indicators that the WAHTS is connected:
- The Headset with Bluetooth icon is displayed in the upper bar
- The WAHTS section will show the WAHTS as connected, identifying the serial number of the device connected
- The WAHTS section will show additional identifying information for the WAHTS such as Serial Number, Firmware, and Battery Level.

The WAHTS should stay connected throughout the duration of any examination. There are a few reasons that it might become disconnected, though still showing as connected:
- The WAHTS has been idle for greater than 15 minutes and has entered Sleep Mode. Due to the idle state of the WAHTS and thus lack of communication with TabSINT, the WAHTS may show as still connected when in fact it is not. Attempting to run an exam will result in an error message and a prompt to reconnect to the device.
- The WAHTS has been turned off. If the Shipping Switch in the red ear cup has been moved to the left, the headset has been turned off. If it is turned off while connected to TabSINT, TabSINT may show the headset as still connected when it is not. Turn the Shipping Switch back on by moving the switch to the right. Then Shake to Wake the headset until blue lights are flashing in the left ear cup.
- The WAHTS needs to be charged. If the battery level falls below an acceptable range, the WAHTS will no longer be able to communicate with TabSINT. If the above two methods do not remedy the problem, the WAHTS may need to be charged.
Once the WAHTS is fully charged and the shipping switch is in the On position with blue lights flashing, reconnect to TabSINT as directed in the WAHTS Quick Start guide of this documentation.
If the WAHTS is not connecting after any of the above procedures reboot the WAHTS by cycling power before re-connecting to TabSINT.
How do I update TabSINT?
TabSINT should have been installed via the Google Play Store as directed in the TabSINT Quick Start Guide and can be updated as follows:
- On your tablet:
- Open the Google Play Store and search for
TabSINT, or - Navigate to
https://play.google.com/storein the web browser and then search forTabSINT
- Open the Google Play Store and search for
- Click
Update
To install TabSINT from the Google Play Store for the first time, follow the Download TabSINT instructions in the TabSINT Quick Start Guide.
It is recommended that TabSINT be downloaded and updated via the Google Play Store. However, to update from the releases repository or to upload an older version of tabsint, follow the instructions in the TabSINT Quick Start section of this documentation.
Once TabSINT is updated, the bottom of the launch screen will show the updated TabSINT version.

How do I update the WAHTS firmware?
Each version of TabSINT requires a specific WAHTS firmware. If the WAHTS connected to TabSINT does not have the required firmware release, you will see an Alert. Although you can run a TabSINT exam with non-compliant firmware, you may get unexpected results or experience additional errors or warning messages. Always update the WAHTS firmware to match the version compatible with the TabSINT release.
For complete details on how to update firmware visit the WAHTS Quick Start page of this documentation.
The Active Tasks showed my firmware was updating but now it's gone? What happened?
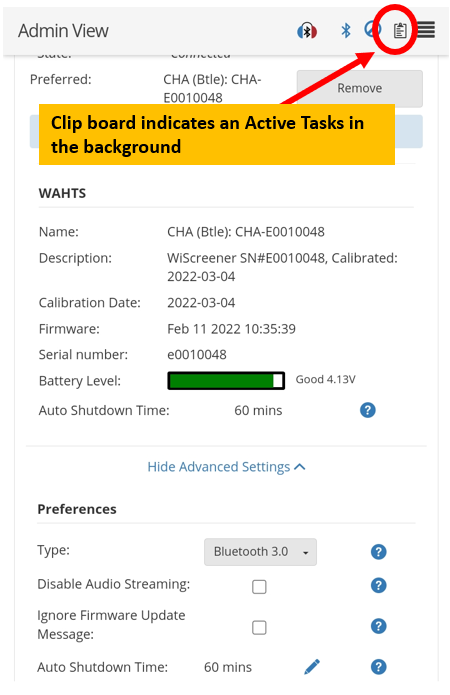
If the Active Tasks gets closed out while a tasks is active, it is moved to a clip board icon in the upper bar of TabSINT. Tap the clip board to view the status of any Active Tasks. If there are no Active Tasks, the clip board will go away.
I received an error message about the tablet volume. What does that mean?
Note: These alerts and errors will most likely only show up when a headset is plugged in or connected via Bluetooth. Before passing the tablet to a subject, connect the headset, reset the exam, and press
Beginto make sure volume control is functioning properly.
TabSINT attempts to change the volume of the tablet to 100% on many different tablet events. This controls the output volume of the tablet while playing calibrated media.
Creare has specifically adapted certain tablets to allow TabSINT full control over media volume for calibrated media playback. On other tablets, TabSINT may have trouble resetting the volume to 100% and will present a pop-up message stating Listening at a high volume for a long time may damage your hearing. Tap OK to allow the volume to be increased above safe levels.
Select OK. Our calibration process will maintain a safe level and TabSINT relies on knowing that the tablet volume is set to 100% in order to produce calibrated levels. Selecting OK will allow TabSINT to set volume levels in the future and should persist until the device is rebooted, though some tablets may limit the duration of the setting to 24 hours. Select OK for any TabSINT error messages about volume not being properly set. Reset the exam to allow the change to take effect.
The TabSINT error messages should stop appearing once the changes take effect. If they do not, and if you see an error message like ERROR: Volume not properly set... but you do NOT see the Listening at high volume... message:
- Go to the Settings menu on the device
- Go to the
Volumesection - Plug in a headset
- Try to raise the volume to max level
- If you get a warning about high volume, select the option that allows you to turn the volume up (usually the
OKoption)
How do I access exam results once the exam is complete?
The Results Tab shows the Completed Tests that are still stored in TabSINT, as well as a list of the Recently Exported results that can no longer be viewed from TabSINT (and indicates where those results were uploaded or exported to). All protocols will save results as JSON files, and some will also save as CSV and/or PDF.
Once results have been uploaded or exported out of TabSINT, how you access them depends on the source of the protocol and your Configuration settings.
For the Audiometry protocol, the results will always save as both an encrypted JSON file and an encrypted CSV file in the tabsint-results/Audiometry folder on the tablet. If the Save Copy as PDF option is selected during the exam, a password-protected PDF file (use the Admin Pin to view file) with the same name will be saved to the tabsint-pdfs folder on the tablet. Connect the tablet to your computer via USB to copy the files off the tablet. You can then use the MATLAB Analysis Tool to decrypt and analyze the JSON and CSV files.
For the Audiometry Admin protocol, the results will always save as a JSON file in the tabsint-results/Audiometry Admin folder on the tablet. If the Save Copy as PDF option is selected during the exam, a password-protected PDF file (use the Admin Pin to view file) with the same name will be saved to the tabsint-pdfs folder on the tablet. Connect the tablet to your computer via USB to copy the files off the tablet.
For Custom Protocols, the results (JSON files) will be uploaded/exported according to the Data Interface and Configuration settings. If the protocol was added to the tablet via Device Storage, the result will be saved to a folder named for the protocol within the tabsint-results folder of the device storage. If the protocol was added to the tablet via Gitlab, the result will be uploaded to Gitlab (unless the Results Mode is set to Export Only, in which case it will be exported to the tabsint-results folder). Protocols can be customized to enable CSV and PDF export. CSV and PDF result files are always saved to the tablet device storage and are never uploaded to Gitlab.
Note that tabsint-results is the default folder for results in the device storage, but this can be changed in the Configuration.
