TabSINT Data Interface
TabSINT can interface with different back-end containers to load protocols and export results.
Device Storage
Data can be transferred into and out of TabSINT using the internal storage of the tablet, which can be accessed from a computer via USB connection. To use this option to load protocols, select Device Storage as the Source on the Protocols Tab. This feature is only supported for Android tablets.
Deploying Protocols
Prepare the Tablet
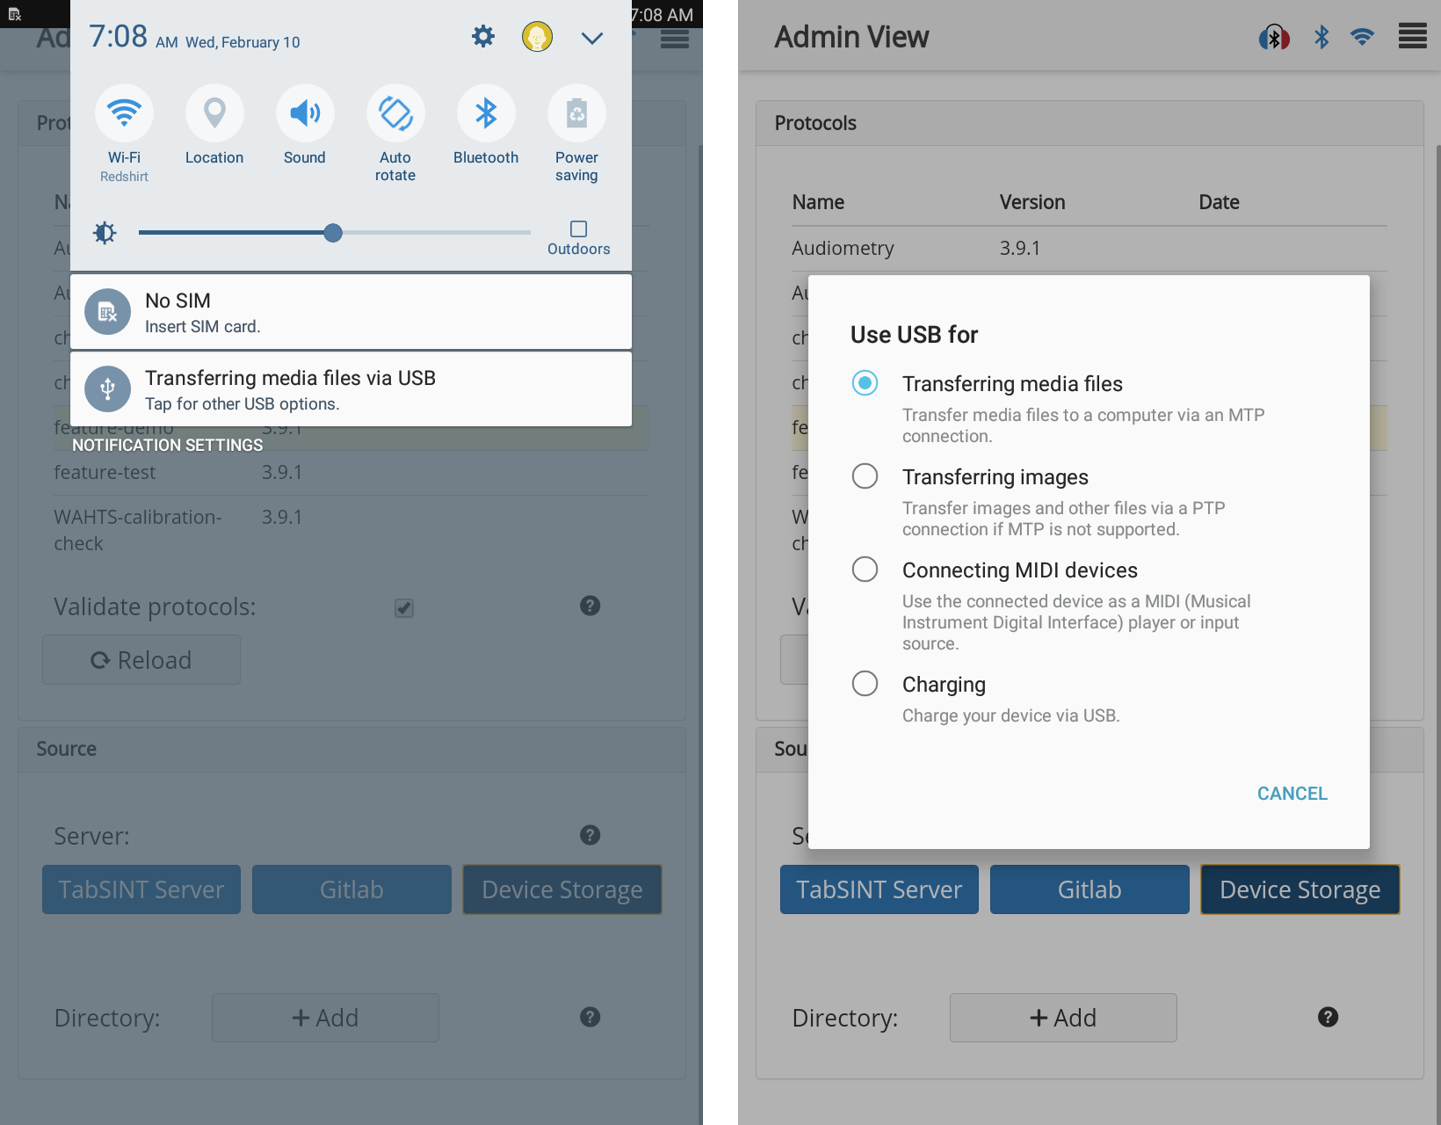
Ensure that the tablet is set up to allow the transfer of files.
- Connect the tablet to your computer via USB.
- If prompted, select
Allowto allow access the the device data. - If not prompted, swipe down near the upper right corner of the tablet to view the settings (below, left).
- Confirm that it lists
Transferring media files via USB. - If not, tap the connection type shown and then select
Transferring media files(below, right).
- Confirm that it lists
Add Protocol to Tablet Storage
With the tablet connected to the computer:
- Windows:
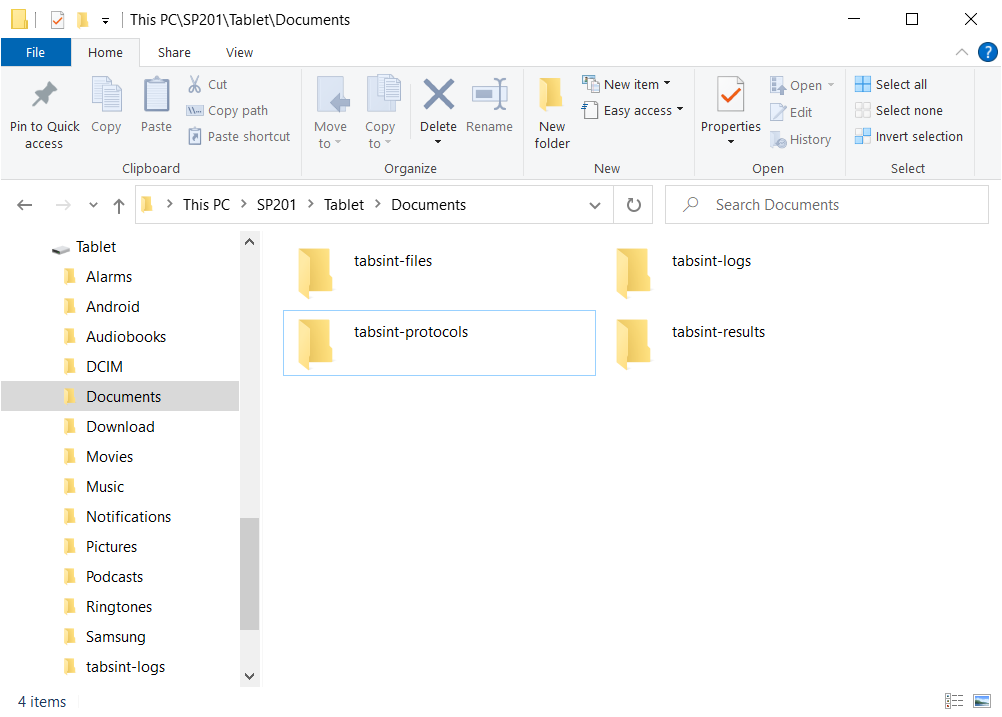
- Launch the File Explorer
- Go to This PC, then look for your tablet under Devices
- Click on the tablet name, then click on Tablet
- In the
Documentsfolder, open the directorytabsint-protocols(if it doesn't exist, create it) - Place the protocol directory here
- Mac:
- You must have Android-File-Transfer installed to move files from a Mac to an Android tablet
- Android-File-Transfer should automatically open when the tablet is connected, displaying the directory contents of the tablet
- Enter the Tablet directory
- Place the protocol directory here
Load the Protocol in TabSINT
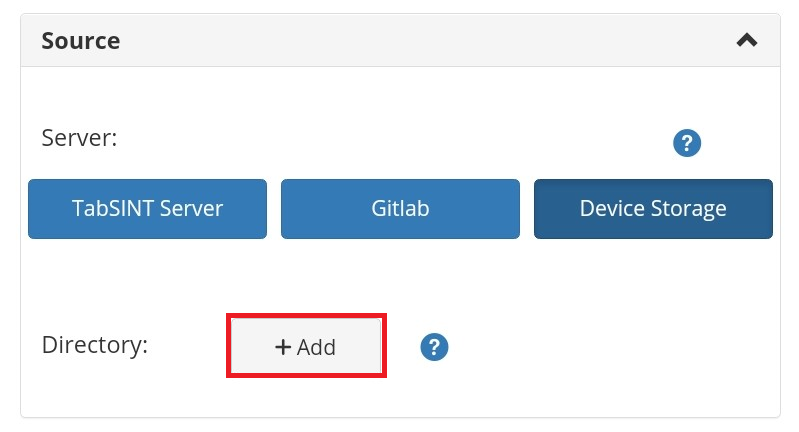
- Navigate to the Source portion of the Protocols Tab
- Confirm that
Device Storageis selected as the Server - Select
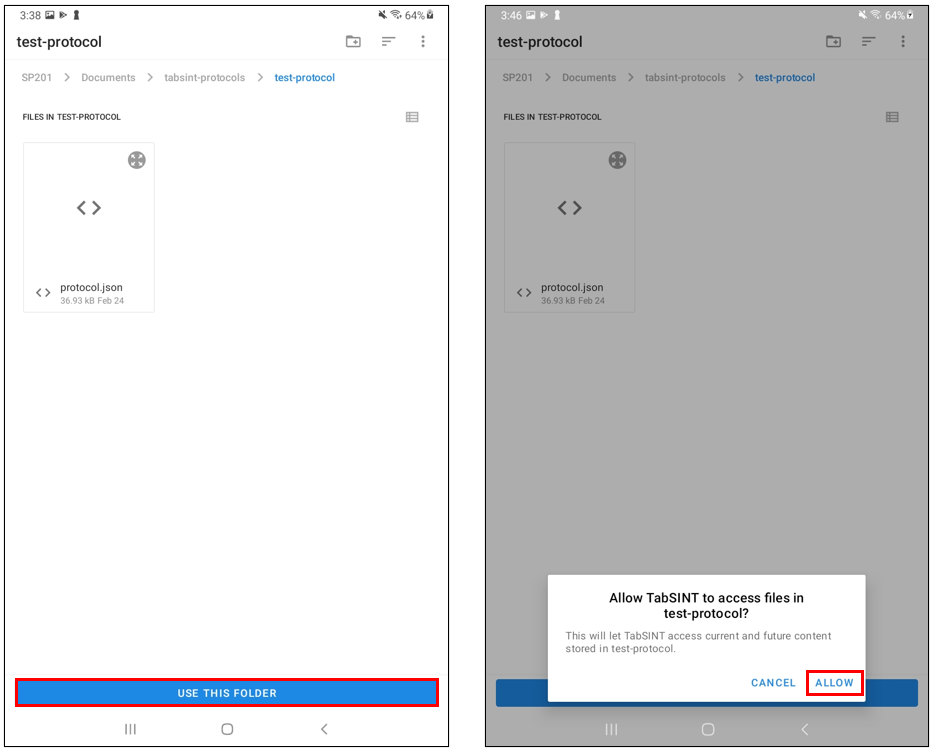
+ Add- Navigate to the directory with your
protocol.jsonfile. Your directory will be located inDocuments/tabsint-protocolson internal storage. - Then press
Use This Folderin the bottom of the pop-up. - When prompted, allow TabSINT to access the folder.
- Navigate to the directory with your
- The protocol has now been added to the Protocols list
- If you load a second protocol from Device Storage with a name matching a protocol already loaded, TabSINT will replace the existing version of the protocol.
Exporting Results
For TabSINT version 4.3.0 and higher, JSON and CSV results files are stored locally in
Internal Storage/Documents/tabsint-results.
To export results to the device storage of the tablet, confirm that the Results Mode in the TabSINT configuration is set to Export Only or Upload/Export.
By default, exported results are saved to a directory called tabsint-results. To save the results to a different location, see the TabSINT configuration.
Gitlab
TabSINT can interface with remote Gitlab repositories to manage protocols and export results.
Gitlab is a program and web service for managing file repositories based on the Git version control system.
Users can host their own instance of Gitlab on a local server, or choose to use https://gitlab.com to host repositories.
The following instructions assume you are using https://gitlab.com to manage your repositories, but TabSINT will interface with any Gitlab instance. Please contact tabsint@creare.com if you would like more information about configuring a Gitlab instance to run with TabSINT.
Background
Git is a powerful program used to version-control files, similar to Track Changes in a Microsoft Word document, but much more detailed. We use Gitlab to track the changes to protocols to maintain versions that can be revisited at a later time.
For background on Git, or Git based version control management, see the following links:
Gitlab.com Setup
Gitlab.com acts as the document store and version tracker for protocol and result files. Because Gitlab is built as a remote host for Git-based repositories, you can choose to manage your repositories locally using Git and push them to a gitlab.com repository.
If you are unfamiliar with Git, you can fully manage your protocols and results using the Gitlab Web Interface. The instructions below provide an introduction on creating and managing repositories from the web interface.
Logging In
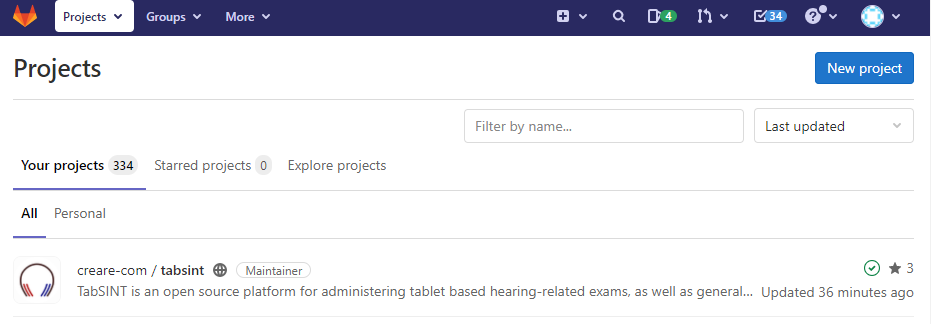
- Visit the Gitlab Sign In Page and sign in with an existing gitlab account, or create a user account and then sign in
- Once logged in, you will see a list of your repositories (a.k.a projects)
Creating a Repository
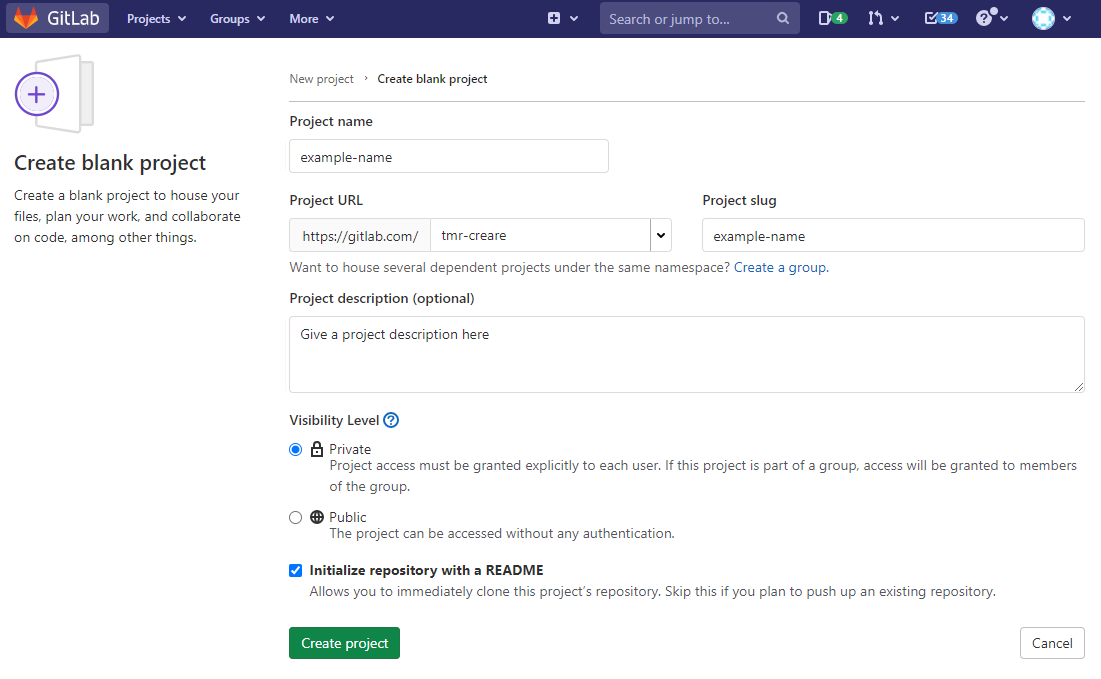
You will need to create a new repository for each protocol and a separate repository for your results.
The protocol repository should be given a meaningful name indicating what it will be used for. The results repository MUST be within the same Gitlab group and it MUST be named results.
- Click on the
New projectbutton in the top right of the projects page - Select
Create blank project - Enter a Project name for the repository (
example-namein the example below)- By default, the repository will be created in your own group (a.k.a namespace) when it generates the project URL
- Enter a Project description for the repository
- Set the visibility level of the repository (generally, you want to leave this as
Private) - Check
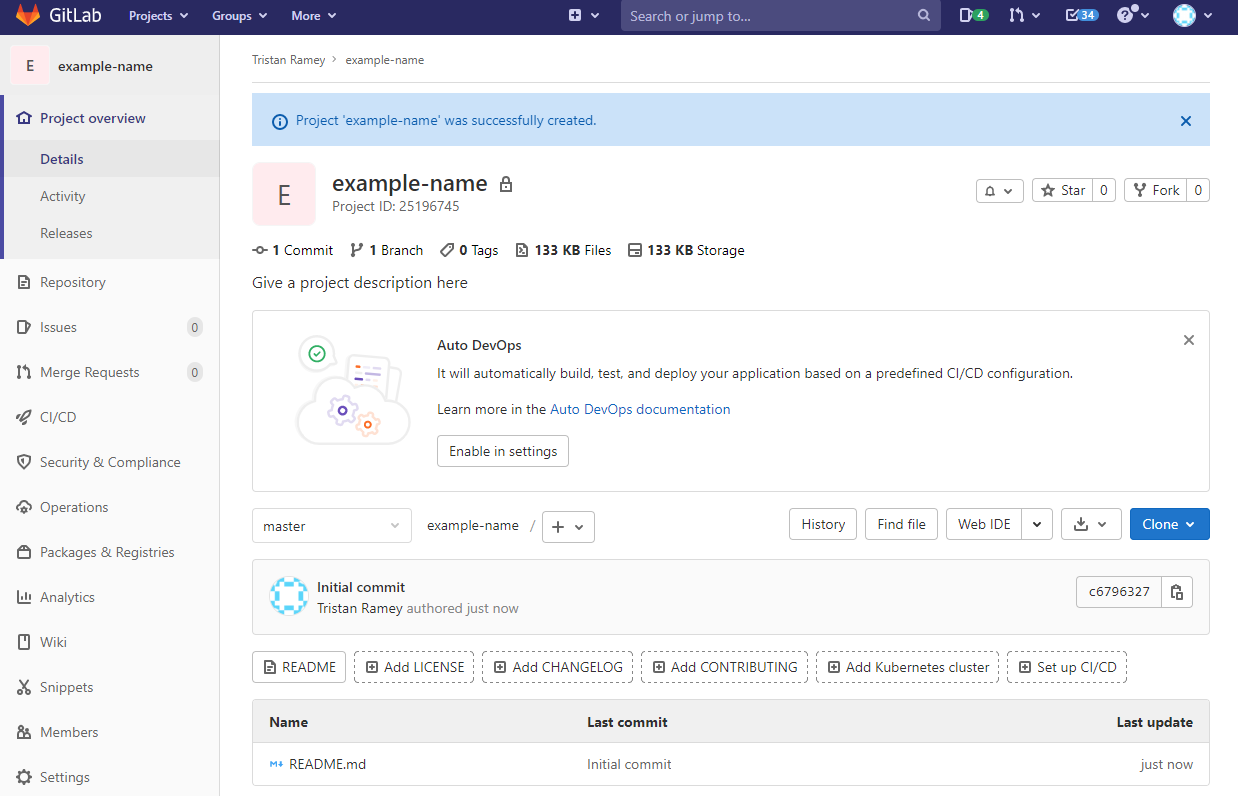
Initialize repository with a README - Press
Create project, and you will be brought to your new project homepage - You can now add and edit files
Adding Files
- Navigate to
Filesin the left-hand menu
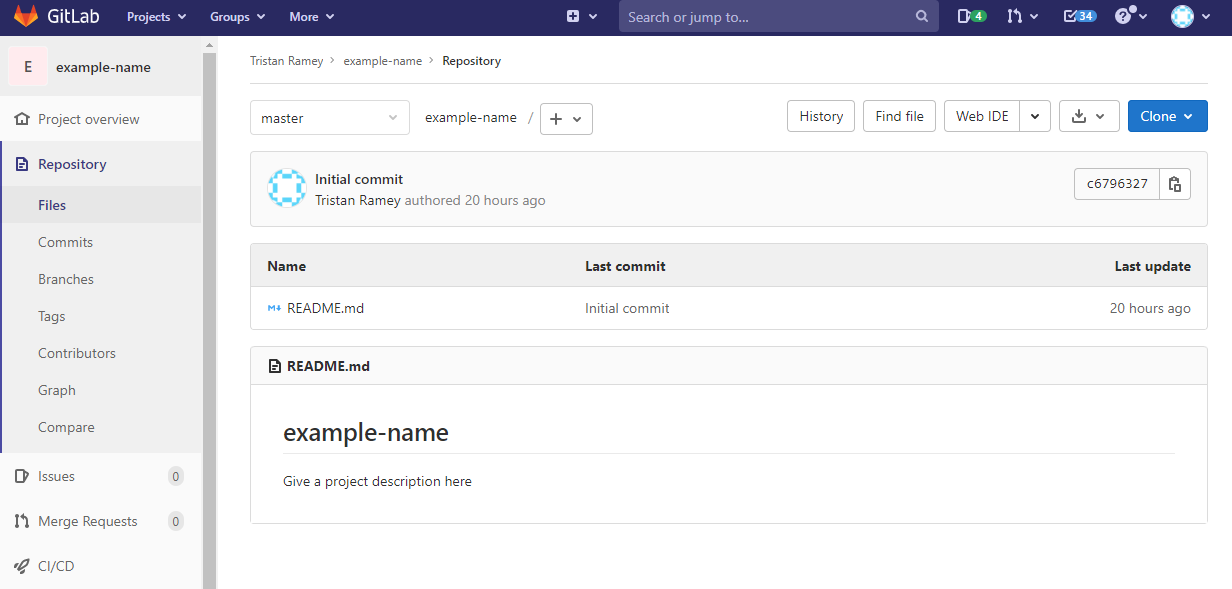
Select the
+button near the top/center of the page and then one of the following options:New File- to create a fileUpload File- to upload an existing file from your computerNew Directory- to create a new directory within your project
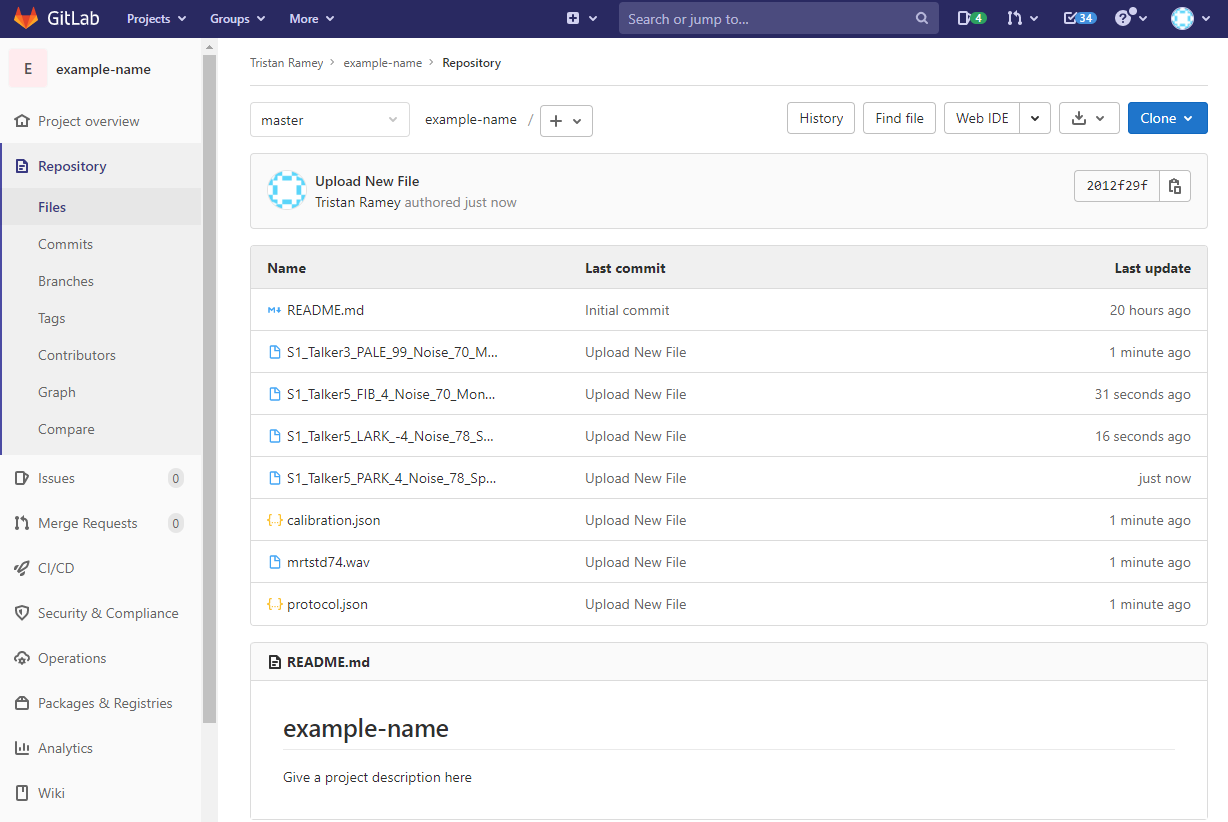
Below shows the example-name repository now populated with a protocol and supporting media files, ready to be loaded onto TabSINT
Tagging a Repository
Repositories can be tagged to mark a specific version or point in time. These tags can then be used to specify the version of the protocol to use in TabSINT. When prompted to update the protocol, TabSINT will default to use latest tag unless otherwise specified (or the latest commit if Only Track Tags in the Gitlab Configuration is unchecked).
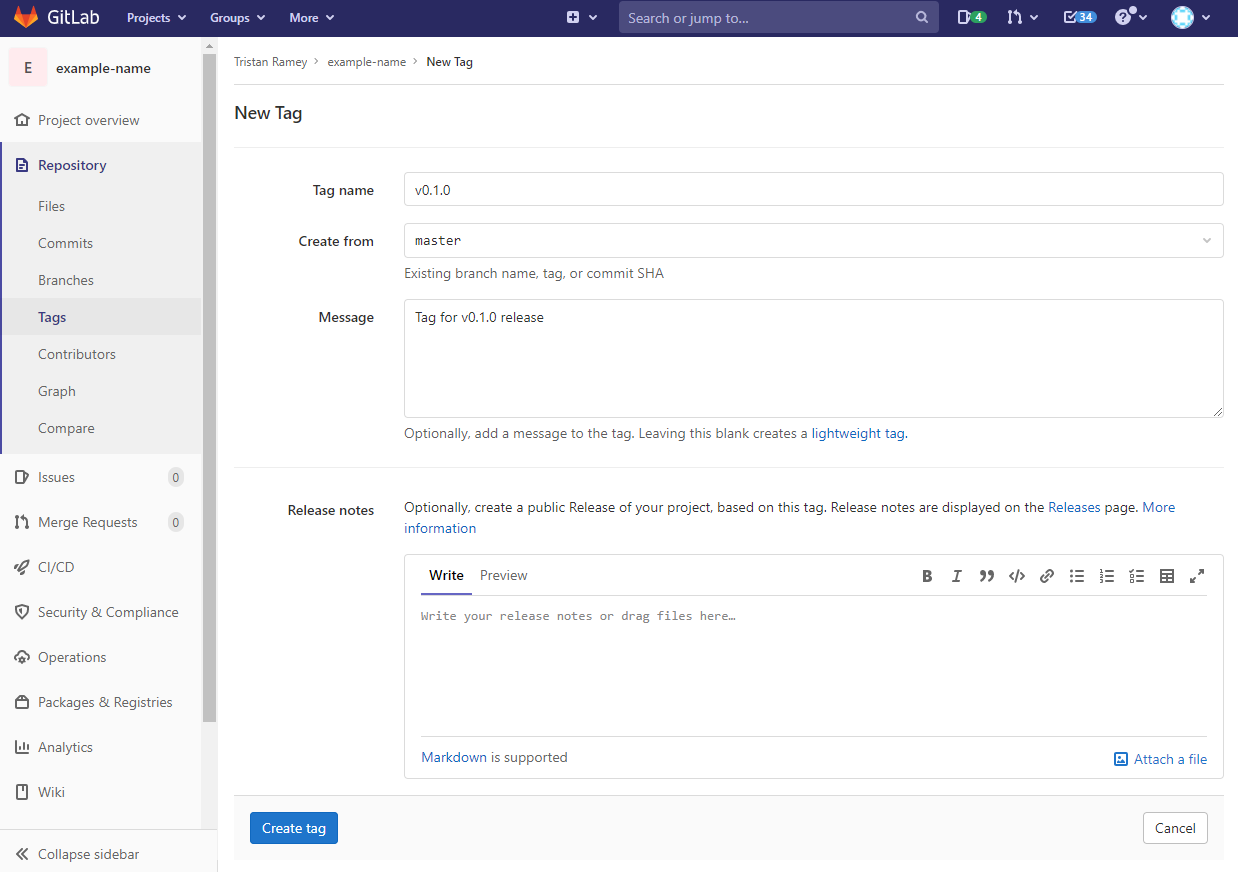
To tag a repository:
- Navigate to
Tagsin the left-hand menu - Select
New tagin the upper right - Enter a
Tag name. This will be listed as the version of the protocol in TabSINT.- Enter a message and release notes (optional)
- Select
Create tag
Configuring TabSINT
TabSINT can be configured to communicate with a remote Gitlab repository in the Source portion of the Protocols Tab.
If your build of TabSINT has been pre-configured with Gitlab credentials, the fields should already be filled in. If you have changed the fields and would like to reset to the build configuration, select Reset to Default (note that if no credentials are found in the build file, the values will not change).
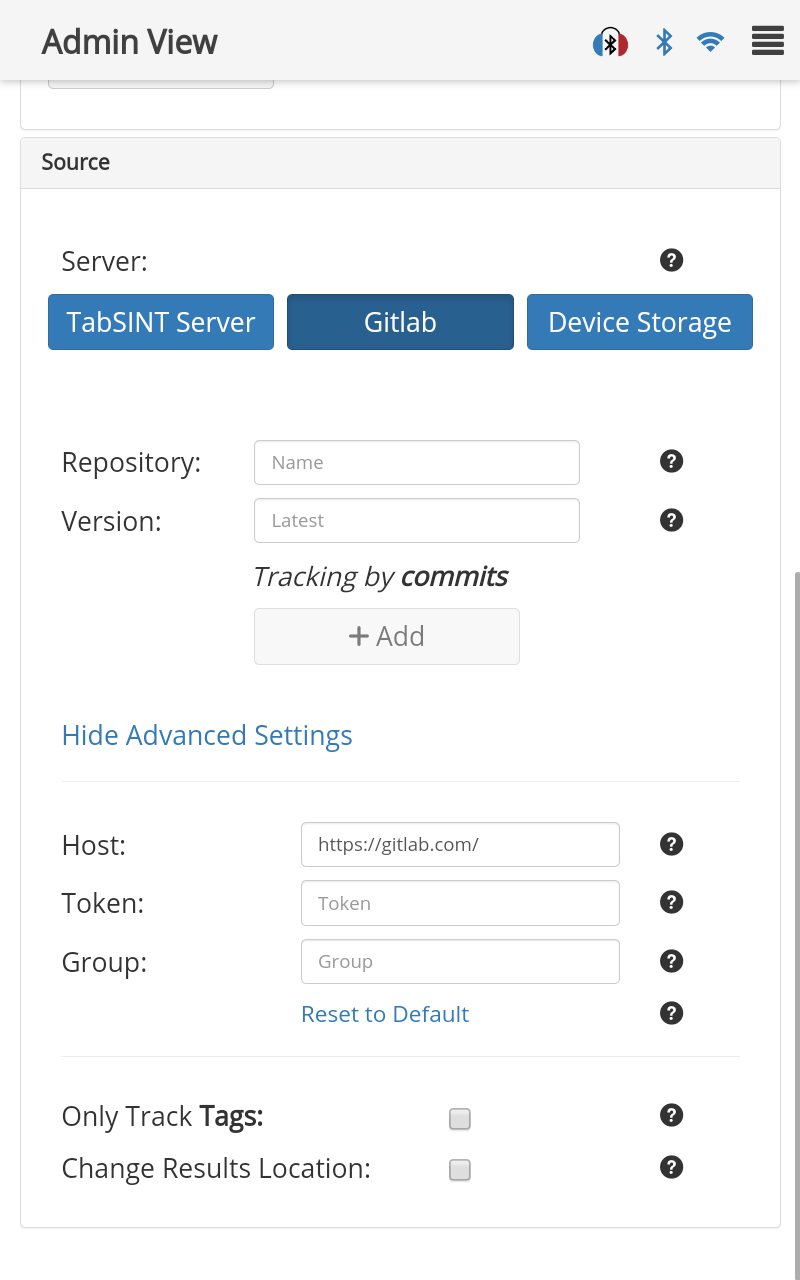
- Host: This is the host URL of the Gitlab instance you are using to manage repositories
- For most users, the host should be set to
https://gitlab.com/ - If you locally host your own Gitlab instance, enter the root URL used to access that instance (i.e.
https://myowngitlab.com/)
- For most users, the host should be set to
- Token: The token is a secret key used to access your repositories. This must be entered correctly (case-sensitive) in order to successfully download from (or push to) repositories. To create a token on
https://gitlab.com/:- Click on your account avatar in the top right of the browser window
- Select
Edit profile - Select
Access Tokensfrom the left-hand menu - Enter a name for the token and set an expiration date (optional)
- Check
apifor the scope and the selectCreate personal access token- Note: Tokens allow access to all repositories that are attached to your username. Please keep the token safe and private! You will not be able to view the token again so be sure to note it. You can revoke a token at any time from this page.
- Namespace: This is the group name used to host your repositories.
- This will be your username if you have not set up any other groups (for example,
tmr-crearein the Creating a Repository example.
- This will be your username if you have not set up any other groups (for example,
Deploying Protocols
Gitlab can be used to deploy (manage) protocols to remote tablets in real time. This includes:
- adding protocols
- updating protocols
- uploading results
To use Gitlab to deploy protocols, Gitlab must be selected as the Server in the Source portion of the Protocols Tab. See Gitlab Configuration for more details.
Adding Protocols
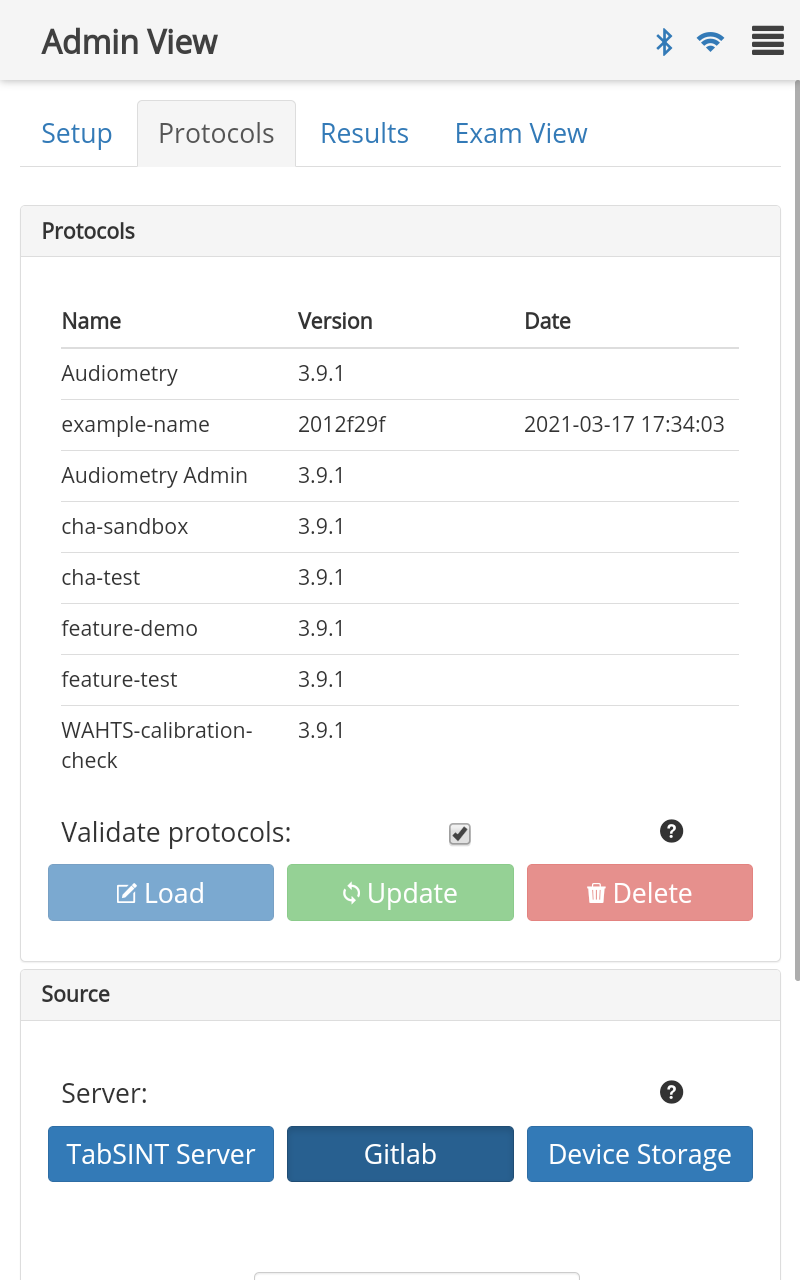
To add a protocol to TabSINT via Gitlab:
- Navigate to the Protocols Tab
- In the Source portion, make sure
Gitlabis selected - Enter the
Host,TokenandGroup - Enter the name of the protocol repository you want to add (i.e. example-name)
- If the
Versionfield is left blank, the latest version will be used - Select
+ Add - The protocol repository will be downloaded to the tablet
- Once the protocol has been downloaded, it will appear in the Protocols list
Updating Protocols
If, after you add the protocol to your tablet, you make changes to the protocol code, you will need to update your tablet in order to use the updated version:
- Select the protocol in the Protocols list
- Select the green
Updatebutton - If a newer version (tag or commit, depending on whether
Only Track Tagsis selected or not) is available, TabSINT will update the local version of the protocol to the latest version - Select the blue
Loadbutton to load the updated version into the Exam View
Uploading Results
If Automatically output test results is checked and Results Mode is either Upload Only or Upload/Export in TabSINT Configuration, results generated from protocols loaded via Gitlab will be automatically uploaded to the Gitlab server. For example, the example-name protocol was added using Gitlab, so the results will automatically be uploaded to Gitlab upon completion of an exam. Note that a results folder must already exist. See Gitlab.com Setup for more information
When TabSINT uploads results to Gitlab, it looks for a repository named results in the same Gitlab group. It then creates a directory within that repository named for the protocol (example-name in this case) and saves all results from that protocol there. If you would like to upload the results to a different directory, use the Change Results Location option in the Gitlab Configuration. Note that if the results repository doesn't exist, the result upload will fail and present an error message.
For more on uploading and exporting results, visit the Results Tab section of the Configuring TabSINT page of this documentation.
TabSINT Server
TabSINT was originally built to work with a back-end LAMP (Linux-Apache-MySQL-Php) server. The original TabSINT server functioned to serve protocols and store results, as well as provide calibrated media for certain devices and headsets. We have since implemented support for the Gitlab data interface to provide a similar service without needing to support a separate server instance.
Currently, the source code for the TabSINT Server is closed source, but we plan to release the API for the server so those with engineering resources could create their own TabSINT Server.
Please contact tabsint@creare.com if you are interested in setting up your own TabSINT Server instance.
