Wireless Automated Hearing-Test System (WAHTS) Quick Start Guide
In documentation and in TabSINT you may come across the word CHA. CHA is the nomenclature for the internal electronics inside the WAHTS and inside some other hearing assessment devices. For the sake of ease, consider the two terms interchangeable.
WAHTS in the Box?
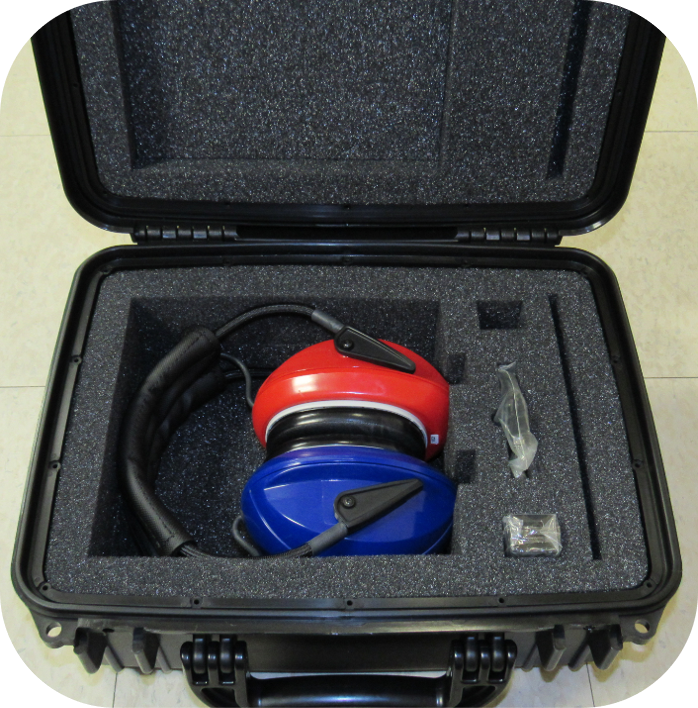
Unless otherwise arranged, your package should contain the following:
- One Wireless Automated Hearing-Test System (WAHTS)
- One micro USB cable with wall charger
- Rechargeable lithium-polymer battery (internal)
- One sturdy travel case to carry the above items
Basic Operation
The WAHTS have an internal rechargeable lithium-polymer battery that must be charged before use. Once received, the WAHTS should be turned on and left on. The WAHTS only need to be turned off prior to shipment, due to shipping regulations.
Shipping Switch
Each WAHTS has a shipping switch in the right/red ear cup.

- Slide the switch to the right to turn the WAHTS on. Sliding the switch to the left disconnects the battery.
- Once the WAHTS is turned on, the shipping switch should remain in the on position. The WAHTS only needs to be turned off prior to shipping.
Charging the WAHTS
Plug the micro USB charger into the port in the left/blue ear cup and connect to the wall charger. The shipping switch must be in the on position for the WAHTS to charge.
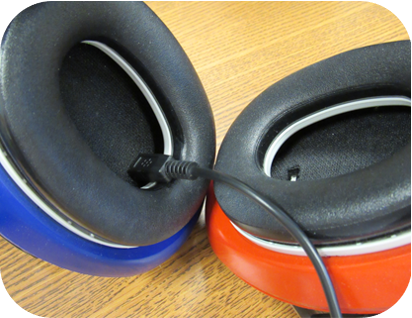
The micro USB chargers have an orientation. It is important to plug them in correctly to not damage the charging port.

At this time, there is no light or LED to indicate the WAHTS is charging or to indicate when charging is complete. The amount of time required to charge depends on the current battery level, but charging for two to three hours should be plenty to fully charge the WAHTS. Once charged, battery levels can be checked by connecting to CHAMI or TabSINT.
Sleep and Wake
The WAHTS will enter a low-power idle state automatically after 15 minutes of inactivity. Bluetooth communication with the WAHTS is impossible in the idle state.
To wake the WAHTS from idle, tap the blue ear cup robustly. This will activate the “shake-to-wake” feature. Looking closely through the black cloth inside the blue ear cup, flashing green and blue lights will be visible after the headset has booted up and is ready for operation.
Connecting WAHTS to TabSINT
The headset communicates over Bluetooth Low Energy (also known as Bluetooth Smart, or Version 4.0+).
If you haven't yet installed TabSINT, return to the TabSINT Quick Start portion of this document.
- Enter the Admin View of TabSINT
- Under the Setup tab, scroll down to the WAHTS section
- Make sure the tablet Bluetooth is turned on, or you will see the message "Bluetooth radio disabled"
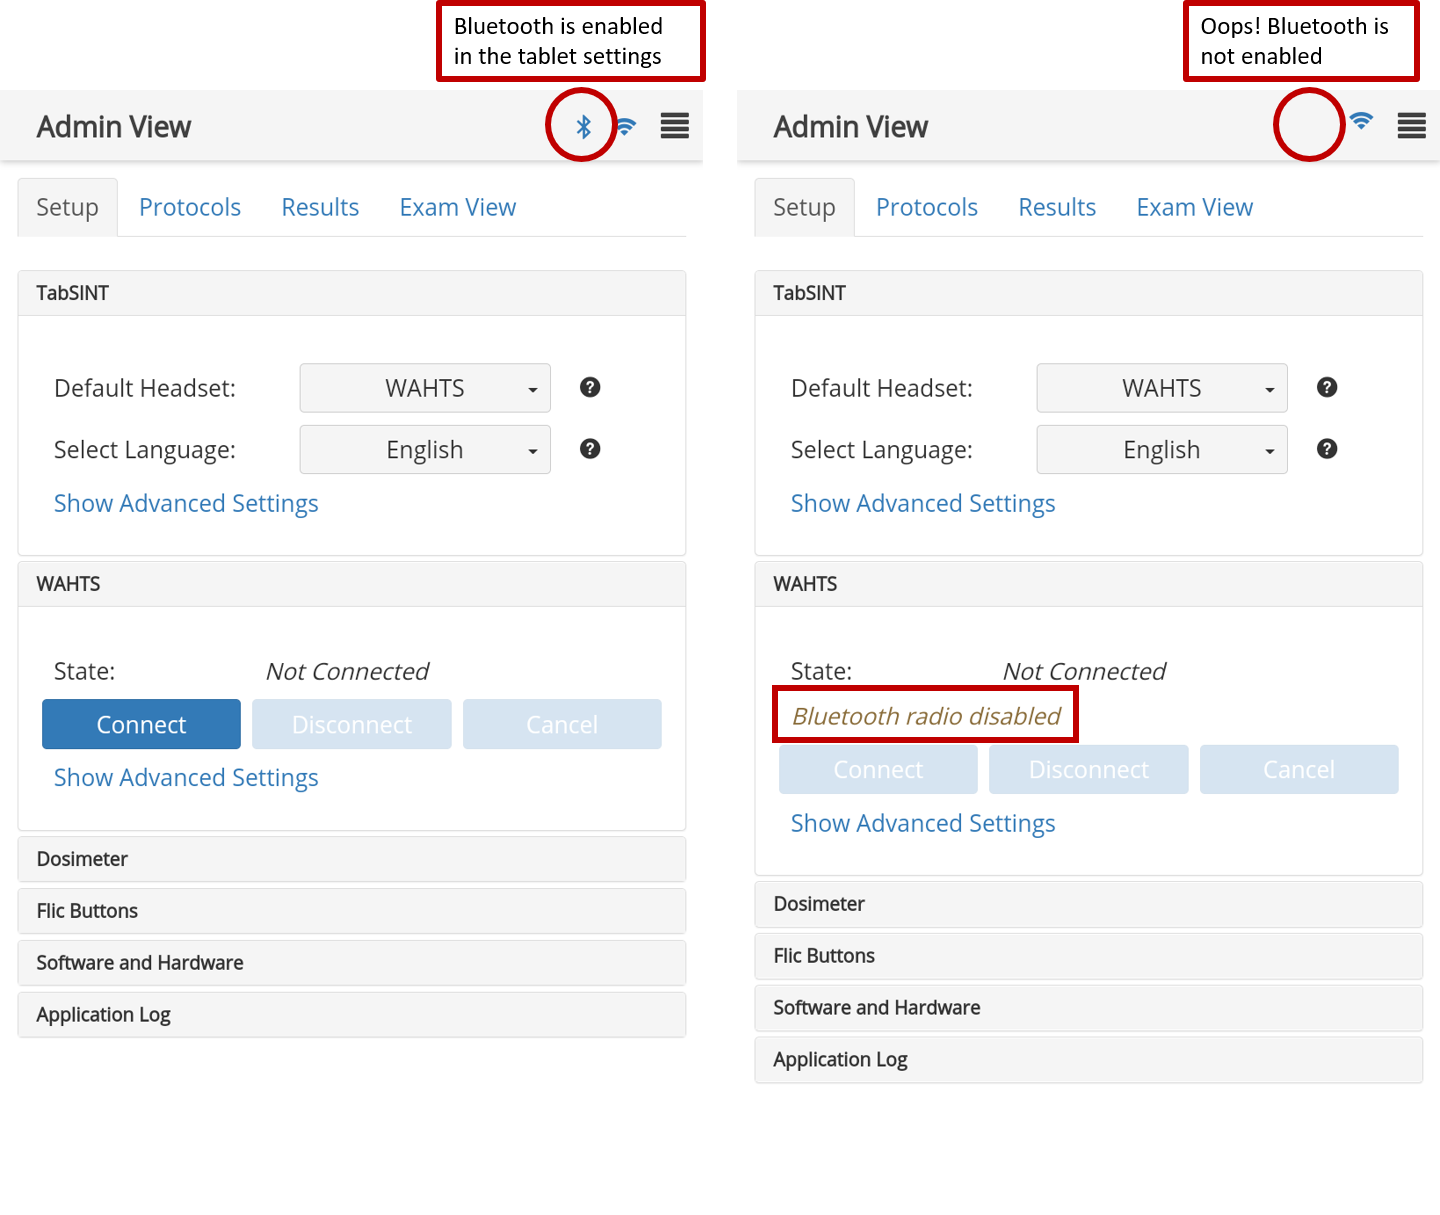
- Make sure the headset is turned on with blue lights flashing
- Select the Connect button
- The first time that you connect a WAHTS after installing TabSINT, you will see an alert asking you to allow TabSINT access to the device's location. You must select Allow. The device's location will NOT be recorded unless the parameter
Record Test Locationin the TabSINT section of the Admin View is turned on.
- The first time that you connect a WAHTS after installing TabSINT, you will see an alert asking you to allow TabSINT access to the device's location. You must select Allow. The device's location will NOT be recorded unless the parameter
- A pop-up will appear with the Bluetooth Devices that are active and in range
- Select the serial number of the headset you wish to connect
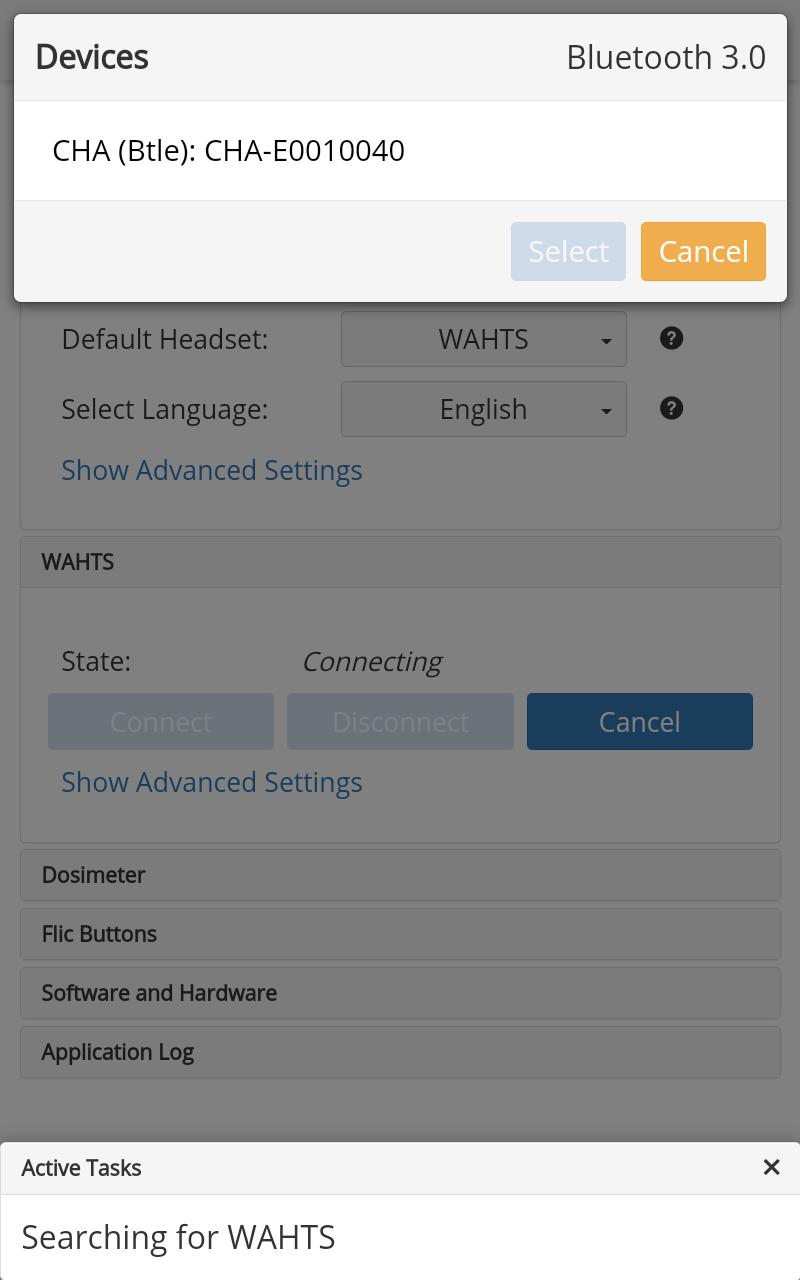
- Once connected a Headset with Bluetooth icon will appear in the upper bar and an additional WAHTS panel will appear. This panel identifies the Name or serial number, the Calibration Date, the Firmware installed, and the Battery Level of the connected WAHTS (CHA), and the Auto Shutdown Time. Follow directions in Configuration section to edit the Auto Shutdown Time. (note: headsets calibrated before September 16, 2020 will not show a Calibration Date).
Clicking on the Headset with Bluetooth icon in the upper bar at any time will display the same information.
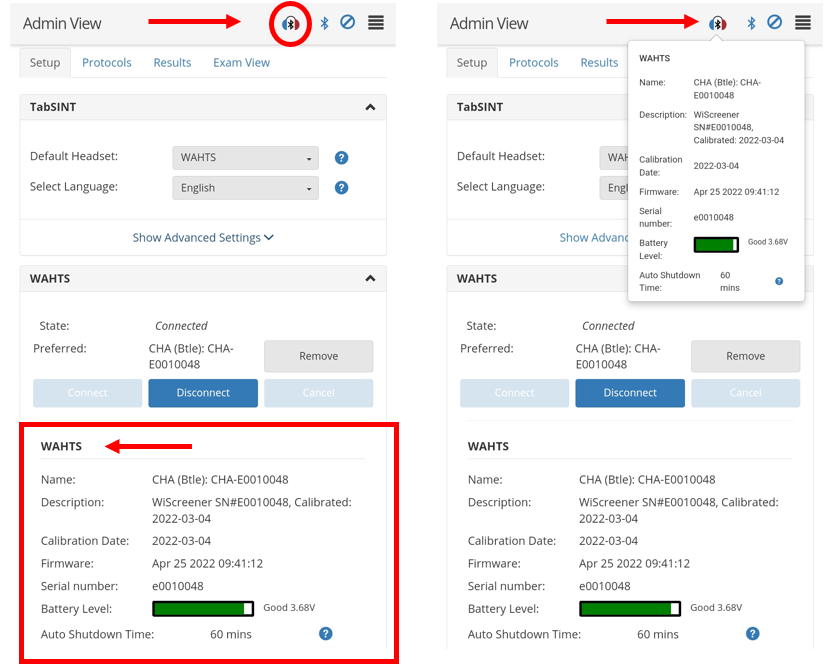
The Headset with Bluetooth icon will remain visible as long as the headset is connected. If the headset is turned off or is inactive long enough to enter sleep mode, it will no longer be connected, but sometimes due to the idle state of the WAHTS and TabSINT, TabSINT may still show the headset as connected. Attempting to run a test will result in an error message that the headset is not connected. To reconnect, wake the headset and reconnect based on the Connecting WAHTS to TabSINT instructions.
Updating Headset Firmware
Each version of TabSINT requires a specific WAHTS firmware. If the headset connected to TabSINT does not have the required firmware, you will see an Alert and you will need to update the firmware.

To update the firmware:
Plug the WAHTS into a power source with a USB cable.
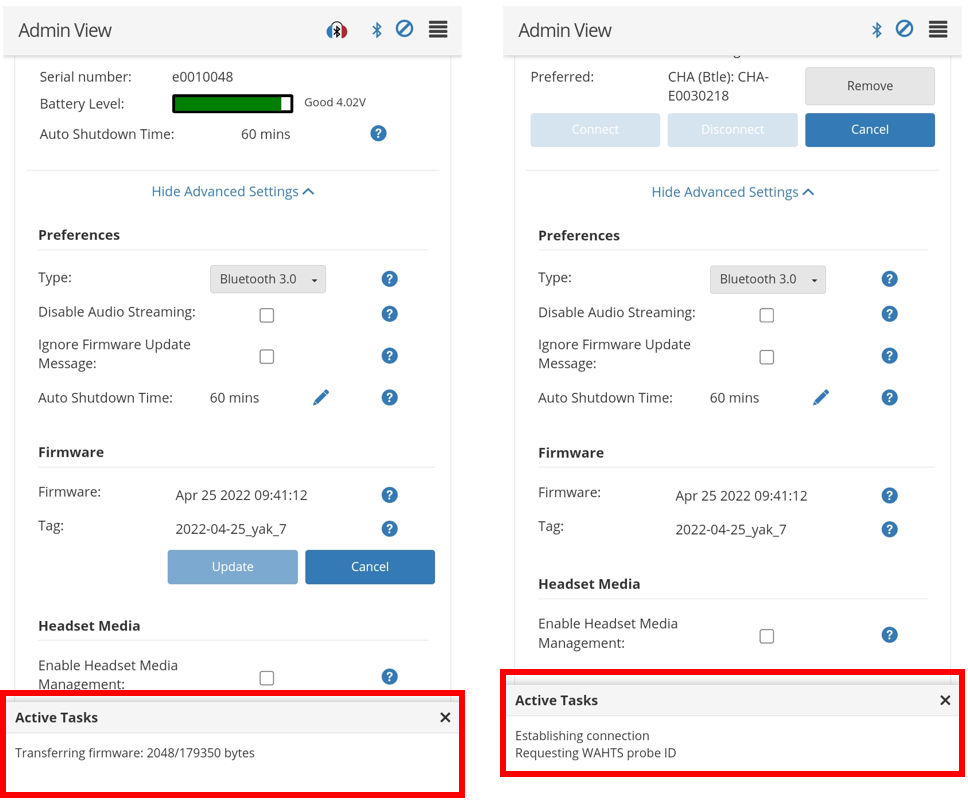
Select Update from the WAHTS Firmware alert OR select Show Advanced Settings in the WAHTS section. There you can see the firmware that is on the WAHTS vs the firmware that this version of TabSINT requires to function properly. Select the blue Update button. The firmware will begin to transfer and you will see the progress under Active Tasks.

Transferring firmware will take a few minutes and then the Active Tasks will state the headset is rebooting.
When prompted, reconnect the WAHTS.
Once complete, you will see that the firmware version displayed in the WAHTS section matches the version listed in the Firmware section.
Active Tasks
- When a headset is connecting, firmware is loading or there are other Active Tasks, a task bar will show at the bottom of the page.
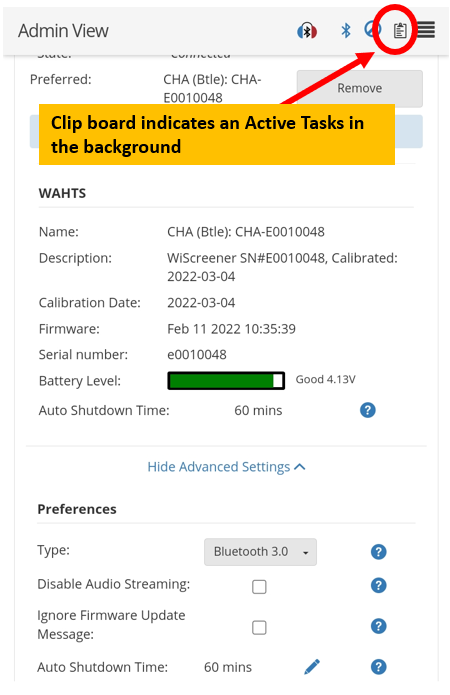
- If the Active Tasks notification is closed but still active, a clip board will appear at the top of the page. Tap on the clip board to see status of any tasks. Once the tasks is complete the clip board will go away.
For more on using the WAHTS with TabSINT, review the Configuration and WAHTS pages of the User Guide.
